 Pressure Tank Problems
Do you have pressure tank problems? If your well tank is more than 8-10 years old, this is a question you’ll want to know the answer to.
With a failing pressure tank, you might be replacing a costly well pump much sooner than expected.
We’ll tell you how this happens, what you can do, and how you can do your own simple DIY test at home to check it.
Why are pressure tank problems a concern?
Pressure tanks take the brunt of the work load away from the submersible pump down in your well. This tank stores a pressurized supply of water for your family to use, whenever they turn on a faucet or run an appliance.
By doing this, a pressure tank forces your well pump to kick on and off far less often.
Why is this important? Because replacing a submersible well pump can be very costly.
Believe me when I say, you won’t want to have to do this too often. Depending on  various factors, hiring a professional to show up and replace your well’s submersed pump can easily end up costing you upward of $1500-$2,000.
Why would I have pressure tank problems?
Think of your pressure tank as having a large rubber exercise ball down inside it. This
thick rubber ball (also known as a bladder) uses its own compressed air and stiffness to literally “push” the water throughout the pipes in your home, each time a person or an appliance uses water.
When these bladders rupture, water pours into the exercise ball. Once this happens, they basically have to rely on their own stiffness to continue doing the job of pushing the water into your home. In other words, they lose their strength.
It also means that your well’s submersed pump is now kicking on and off A LOT more often, and doing most of the work.
Why is this bad?
Pumps, by nature, don’t like turning on and off a lot. They like consistency. They’re designed to last a lot longer when they are either running all the time, or not at all. Too much change from these patterns, and they burn out quite quickly.
Before you know it…no more water in the house!
How do I check for Pressure Tank Problems
The steps outlined below are not a guarantee that your pressure tank is bad, but they are a very reliable place to start. It’s the same process we use to begin checking them.
There are, at times, other problems that can make it seem as though your tank might in fact be bad when it’s not (see below).
The test is also designed to be used on a typically sized pressure tank-not on an oversized tank. Most home pressure tanks have, on average, about a 5 gallon “draw down” or supply of water. These tanks are usually 2 ½’ to 3’ in height. If your tank is much larger than this, you’ll probably want to speak with your water treatment professional before doing the test.
After following the steps, if you suspect your tank is bad, once again, you’ll want to speak with your local treatment professional. They should be able to do a more thorough test to determine specific issues.
Testing your Pressure Tank
*The following steps can be done with one person, but are a little more difficult to do by yourself. For time and simplicity, we recommend having 2 people when you do the test.
One person will stand next to the pressure tank (usually in the basement or utility room) and one person will stand next to the nearest sink within voice distance (usually the kitchen sink)
BEFORE YOU DO THE TEST
-Grab a stopwatch or some sort of timer with a second hand The person next
to the pressure tank will need this.
-Have your helper standing by at the kitchen sink faucet (or nearest sink) Make sure they are within voice distance to help with the following steps.
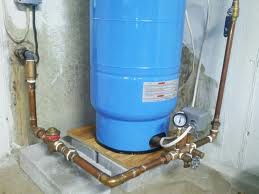
-Locate your tank’s pressure gauge This will most likely be a small black &
white circular gauge, about an 1 1/2” in diameter, near the bottom of the tank. It should have psi (pounds per square inch) numbers around its face that increase by 5s or 10s.
-Determine how your tank’s pressure cycle has been set up Tanks and well pumps are set up using a high and a low setting. They usually run on a 30/50 psi cycle or a 40/60 psi cycle.
When water in the home is being used and the tank’s pressure/water supply reaches the low setting, the tank has become empty. It then sends a message to the pump in the well telling it “hey…I’m out of water-send me some more until this gauge reaches the high number.” The pump starts sending new water to the tank. Once the pressure reaches the high point, the pump stops running. Now any water used in the house is coming directly from the newly filled water supply in the tank.
To check your psi cycle:
Have your partner at the sink run the cold water for a few minutes while you watch the gauge at the tank. The needle should very slowly drop until you hear a “click” when it hits the low setting (30 or 40 psi). It will then immediately begin to climb on its own until it “re-fills” to its maximum and arrives at 50 psi or 60 psi. It should then “click” once again.
Watching this process will tell you if you have a 30/50 cycle or a 40/60 cycle.
*Note: If you find that your pressure gauge is not working, no worries. The test will still work fine. Just listen for the “clicks” we mentioned. The main goal here is to measure the time it takes to fill the tank back up (the time between low and high clicks).
PERFORM THE TEST
Once you know the psi cycle you can start the test. It’s very simple, but will take a few minutes to do.
- Standing next to the tank, with your timer in hand, tell/shout to your partner to turn on the cold water at the sink. Once the water starts running, the needle will slowly begin to drop until it reaches the low setting.
- Keep your eye on the pressure gauge, with your timer in hand. Don’t start the timer yet. You’ll start the timer once it clicks and hits the “low” setting.
- Continue to watch the needle drop. Once you hear the click and the needle hits the low point, immediately tell your partner to shut off the water at the sink. Start your timer now.
- While your timer is counting, watch the needle on the gauge rise. Let it continue to count seconds, until the needle reaches its high point, and you hear the click again. When it does, immediately stop your timer.
- Check your timer. How many seconds did this process take?
The goal here is to see if the process takes, at minimum, 1 minute or longer. Longer than 1 minute is great. Shorter is bad.
The shorter the time, the more likely the bladder inside the tank has ruptured. If your timer results came back at 20 or 30 seconds, that means your tank is most likely running at approximately 1/3 of its capacity.
In other words, your well’s pump is kicking on and off about 3 times as often as it should. It’s running triple time and on a pace to burn itself out much, much quicker than normal if the problem isn’t corrected.
Next stop on the water supply train ride…well pump replacement.
Now what do I do?
If you suspect you have pressure tank problems the best thing you can do is to contact a professional that deals in water treatment or well systems.
As mentioned before, there are other issues that can skew the results of this test.
Quite often a pressure tank has been inappropriately sized for the pump used in the well. In other words, they aren’t playing well together. Usually the tank is too small for the pump itself. This will also cause the pump to work much harder and more frequent. You may need to replace the tank with a larger capacity unit, to avoid problems.
In either case, it’s wise to speak with someone who will give you the answers you need.
In the long performing these simple steps and checking for pressure tank problems could save you a lot of aggravation and possibly a lot of money.


